
This is modeled after a plan on Ana's website, with some changes:
SHOPPING LIST: (You may have some of these pieces on-hand as SCRAP)
2 - 1x6@ 11.75" (for sides of grocery) **the sides will be sawed to an angle on one end**
2 - 1x6@ 10.5" (for shelves)
1 - 1x4@ 13" (For top of grocery)
2 - 1x2@10.5" (for bottom front and back toe kick)
1 - acrylic @ 6.5"x11.75" (for bottom front "glass" on grocery)
1 - acrylic @ 4.5"x11.75" (for top front "glass" on grocery)
Air nailer / 1.5" Nails
drill / 1" screws (for screwing on acrylic to front of grocery)
small drill bit to pre-drill screw holes
square
tape measure / pencil
small hand saw
120 Grit sand paper
wood putty to fill holes and knots
Paint or stain to finish your piece (if desired)
INSTRUCTIONS:
1. Cut out all of your pieces of wood to the sizes specified in the shopping list.
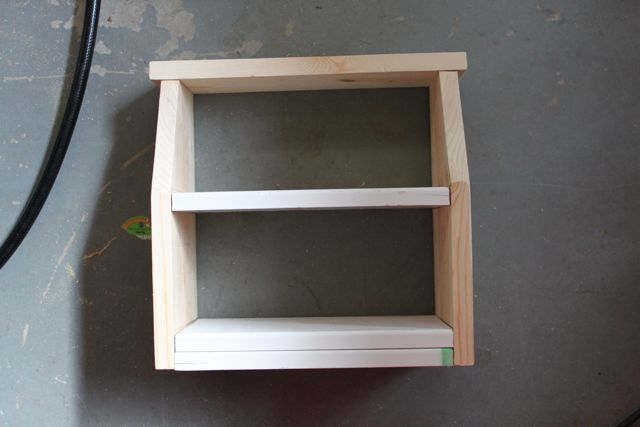
2. Mark your grocery SIDES where you want your shelves to be placed:
***my shelves are placed at
Lower Shelf: .75" from bottom of grocery side to bottom of lower shelf
Middle Shelf: 6" from bottom of grocery side to bottom of middle shelf
(I then added the measurements of the top shelf to the "top" of the grocery sides, and then drew a line from that measurement to the top of the middle shelf, creating the angle to cut.)

3. Nail on your bottom and middle shelves.

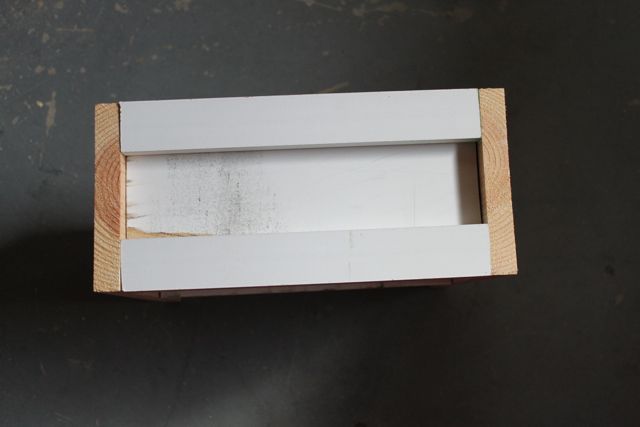
4. Nail on your toe kicks to the front and back of your grocery. (I nailed my 1x2 toe kicks on their sides instead of standing up as in other plans.)

This is what it looks like from the bottom:
5. Nail on your top shelf, making sure that the shelf is centered on the grocery sides:
6. Fill all nail holes with wood putty and let dry.
7. Sand well.
8. Paint or stain piece to your desired finish.
9. Attach your 2 pieces of acrylic to your grocery using 1" screws. (Be sure to pre-drill your holes through the acrylic and the wood!)
10. You are now READY TO PLAY!!
Maybe it's a bakery....

Maybe it's a pizzeria...

Maybe it's an Ice Cream Shop...

And for your added enjoyment....
A CANNED GOODS TUTORIAL:

You need 8 pieces of .75" dowel cut to 1.25" long
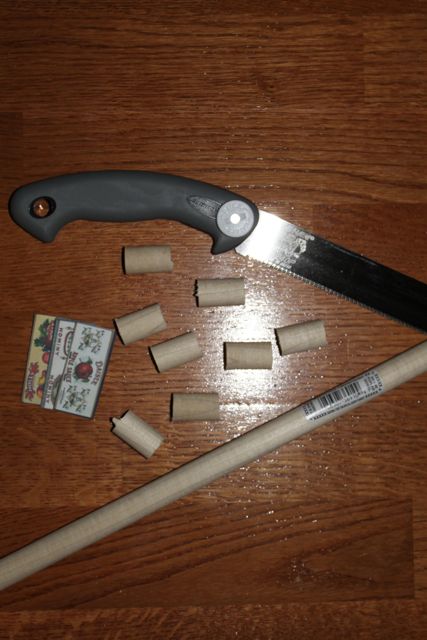
Sand your pieces well...

Paint the ends with silver craft paint...

Go to Jim's Print Minis:
Print out this page at 150%.
Cut out images.
Decoupage images onto dowels, making sure to add decoupage on top of labels to protect them.
After they are dry, you have this:
Make as many as you need to fill your grocery shelves!! :)
Please feel free to use these plans to build furniture, for sale or for pleasure, but please do not sell the PLANS as your "own". Please also give credit to me and link back here! I hope you enjoy them!!
***I am NOT LIABLE for any plans featured here. Please take every precaution and use your own discretion to make sure these toys are safe for children to play with them.
I was getting ready to give this plan a try, and noticed "1 - 1x2@10.5" (for bottom front and back toe kick)" it says only 1, 1x2 is needed, should I just double this to 2 since you use one for the front and back?
ReplyDeleteAmanda,
ReplyDeleteYes. You are absolutely correct. The cut list should read " 2- 1x2s @ 10.5" " as the pictures show. I will correct it now! Thanks for the correction! :)
Kristi